How to Age Paper (Without Tea or Coffee)

If you read the Junk Journal FAQ and saw that tea and coffee can be bad for your journals long term, you might be wondering how to age paper without tea or coffee. This way is relatively simple and gives you the look and feel of tea dyed paper without the acid, and best yet its very easy to adjust the color and blends of the paper as well.
(Transparency note: I often link to resources in my blog posts that I believe are useful and these are sometimes affiliate links. That means if you choose to purchase through my links, I may make a small commission with no extra charge to you. For more info you can read more in my privacy and disclosure policy.)
What you’ll need to get started:
- Paper
- Tim Holtz Distress Ink Stain in Antique Linen, Vintage Photo, Tea Dye and/or Walnut Stain
- Gloves (Optional but prevents staining your hands)
- Wax or Parchment Paper
Prepping Your Work Area to Make Aged Paper
I recommend you wear gloves for this. When I don’t wear them and my hands invariably get stained. This comes out after a few washes, but you’d probably be better off by just wearing gloves
To get started you’ll want to grab two pieces of wax paper about twice the size of the paper you plan to dye. Place one in your work space and the other off to the side. The second piece will give us a place to put the paper to let it dry.
Then make sure you have your paper close by. I always recommend using a higher quality paper in your journals, but even computer paper will work for this method.
Finally, you’ll want your distress spray stains. For making papers look aged you’ll want to get the set of stains that contains antique linen, vintage photo and walnut stain. Later we’ll talk about bringing other colors into the mix, but you’ll want to start with those.
Other Tutorials and Articles You Might Enjoy:
How to Age Paper Without Tea or Coffee
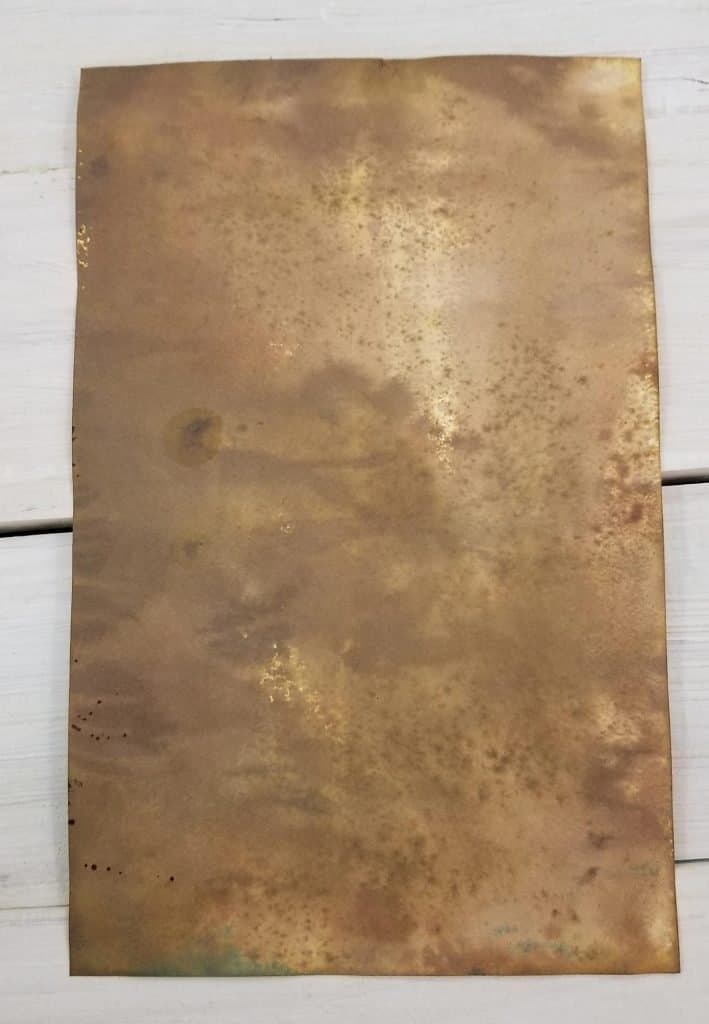
To start, spray the surface of the wax paper with vintage photo and antique linen. The ratio is up to you. If you want a lighter color, use more antique linen, and if you want it darker use vintage photo. Note that the sprays are a bit darker than their stamp ink counterparts.
The dyes will bead up on the wax paper and that’s okay. That’s what we want to happen.
Make sure that you’ve sprayed surface wide and long enough for your paper. Then take your paper and place it face down into the ink. Run your finger along the back of the page to make sure that it makes contact with all of the ink. Once you’ve covered the entire surface, you can flip it over.
You may still have spots that are “blank”. If you do, you can either spray the surface with additional ink. I recommend using the lighter color as this will help it blend better. When you do this the distress sprays also react with each other and take on a really beautiful droplet style that mimics the look of foxing on the papers.
The other option is to turn the paper face down again and slide it over the surface of the wax paper. This will give you more of a watercolor style effect.
If you have extra dye pooling on the surface of your paper, you have a few options.
You can let it stay and dry on the surface, which will give you a deeper color on those areas. I particularly love running the dye along the edges of the paper slowly by tilting it. This gives an extra darkness to the edges that’s really pretty.
If you’d rather not have your papers that dark, you can also take a paper towel and gently blot the surface to take up the excess ink. This also helps mute the color a bit and disperse it better across the surface, which might be a look you want to try. You can also dilute the dye to get even softer colors. You’ll want to experiment on scrap paper if you have a certain shade in mind!
Here’s an example of the more muted color using the paper towel method:

You can also use the excess dye to run the edges of your tags through to get that aged look on the edges:

How to Get the Wrinkled Look in Your Faux Aged Papers
So dying your papers this way won’t get you the same wrinkled look as coffee and tea dying since you aren’t completely submerging them in water. If that’s something you still want in your paper, don’t worry.
Once you’ve dipped the paper in the ink and the paper is damp, start scrunching the surface of the paper. Then set it aside scrunched to dry, and you’ll get the crinkly look you’re going for.
How to Conserve Ink
Now, I know some people will worry about the amount of ink being used here. After all, coffee and tea dying is pretty cheap and these inks aren’t. That’s completely understandable.
If you’re worried about wasting ink, you can also take another piece of paper and press it to the surface of the paper you dyed. You won’t get enough ink to cover a whole second page, but you might get enough that you just need a few sprays to the surface to finish it.
Another option is to make your own dyes. There are lots of different methods for this, which would probably be an entirely separate tutorial. But one of the easiest ways, is to take watercolors (the kind that you can get in the tube not the palettes) and put some in a spray bottle, add water, and shake. These usually aren’t quite as stunning as the inks because the pigment is diluted, but you can still get a really beautiful look.

Adding Other Colors to the Process
The next thing you can do, is start experimenting with other colors. If you want a darker look, trying adding walnut stain or black soot to the mix. To avoid getting it too dark, I recommend only one or two spritzes to the surface of your wax paper. Or better yet, just dropping a few drops on one you’re done.
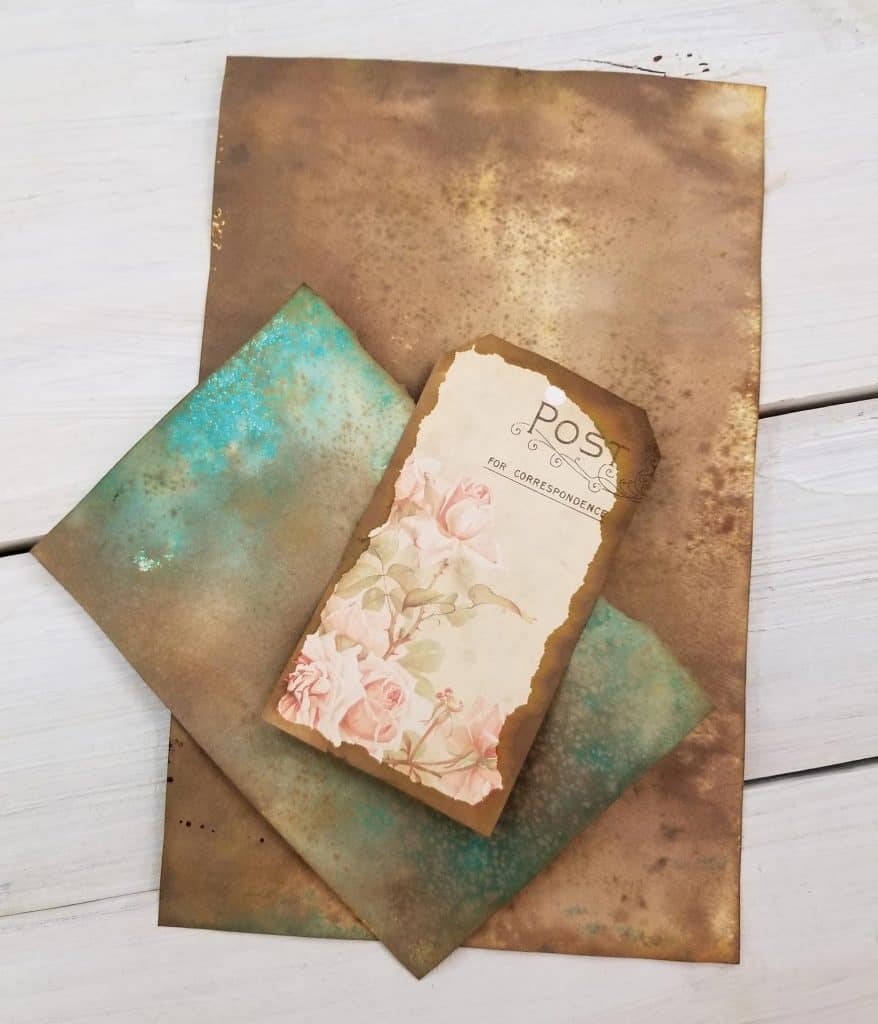
I like adding bright colors into the mix too. Its definitely not that faux aged look anymore when you do this, but you could certainly add something like a deep red to make it look like a wine stain, or a turquoise to make it look like a patina.
The options are endless!
Do you have other creative methods you use to “age” your papers? I’d love to hear in the comments below!
Like it? Pin it for later:


Thank you for your ideas! I especially like the look of the turquoise patina. I learned a tip today from Nik the Booksmith: if you add a teaspoon of baking soda to your tea or coffee bath it will neutralize the acid!
If you add baking soda to the tea or coffee it neutralizes the acid.
Thank you for the idea.